
A quick guide for college & university recruiting teams updating their Slate integration with CollegeVine.

Before you begin:
Integrating new partners into your CRM can be daunting! But we’re here to make this super smooth so you can be up and running in no time and smash your recruiting goals. 🚀
This guide will walk you through the end-to-end process of integrating CollegeVine into Slate.
Before you complete the integration in your production environment, we highly recommend you run the process through in a test environment to make sure everything is working properly.
Integration Overview
CollegeVine’s integration with Slate is straightforward: we sync the contact data from all students you connect with on CollegeVine to your student contact records in Slate. Your integration requires you to import additional CollegeVine fields to Slate and connect your Slate instance to the CollegeVine platform.
We’ll walk you through all of this in 7 simple steps! It’s very important that you complete the integration process in the exact order specified below.
1: Import fields
📁 CollegeVine Fields: fields-20240205.xlsx
Next, we’re going to import all the new fields that come along with CollegeVine student profiles. Navigate again to Database → Source Formats. Select the “Field Import” source format.
Note: If you don’t see “Field Import”, navigate to Database → Source Format Library and click “Add” on the “Field Import”' item.
Click “Upload File(s)” in the right sidebar and add the “CollegeVine Fields” file linked above. Click “Upload”.
Confirm that the field upload worked by navigating to Database → Fields. You should see the newly imported fields there. It can take a few minutes to a few hours for the new fields to appear. Do not move on to the next step until you see the fields here.
2: Import CollegeVine source format
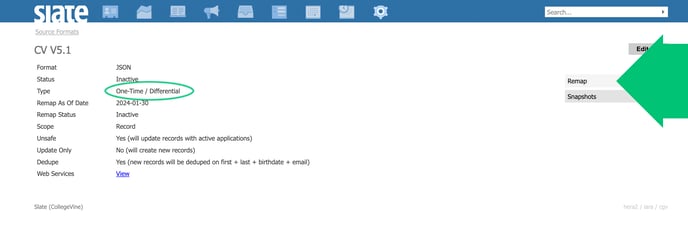
Next, we need to import the CollegeVine source format. This source format provides a specification of an endpoint and data mapping within Slate that can be used by the CollegeVine app to send data to Slate. There is a separate source format for each integration version, and source formats are named for the integration version. This source format is version “CV V5.2”.
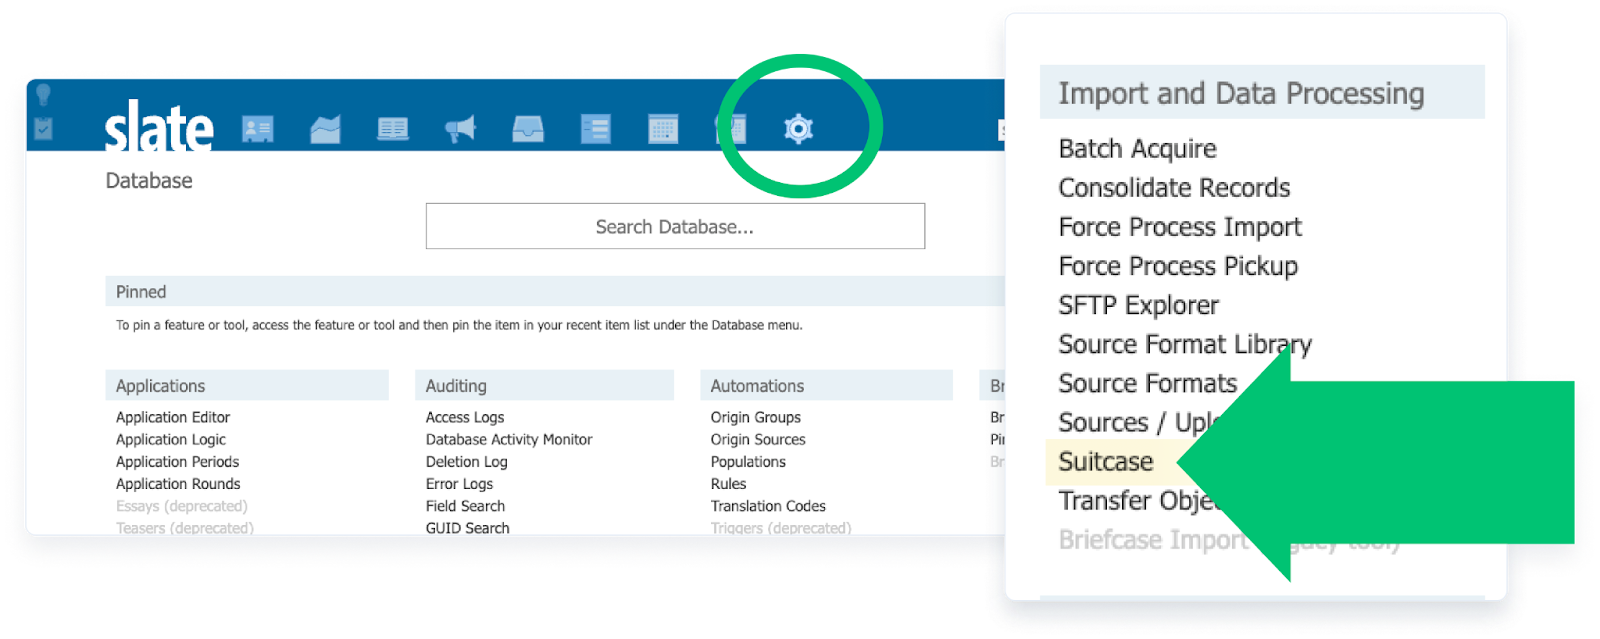
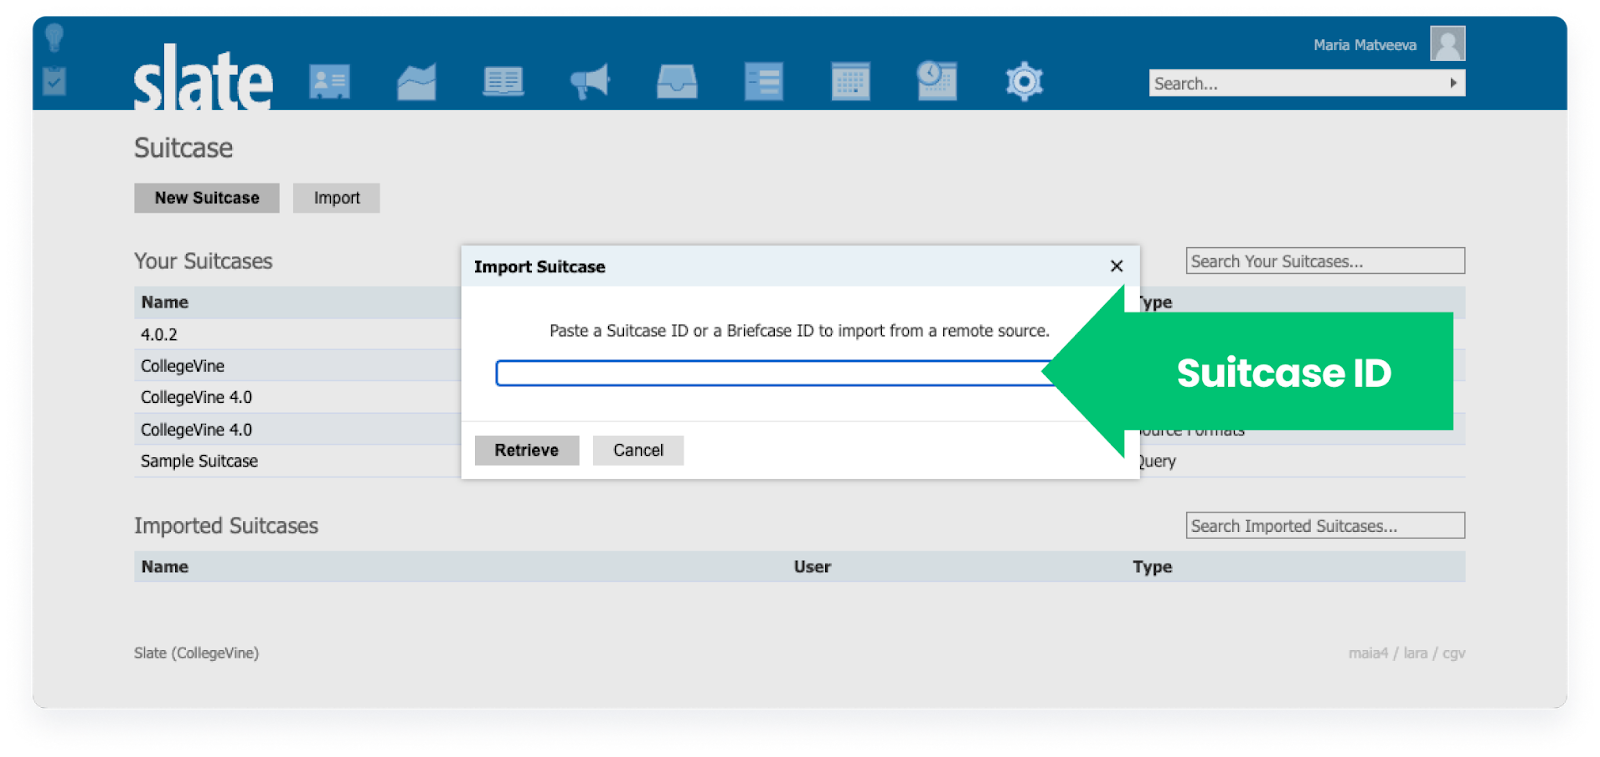
Source formats are imported via a Slate Suitcase. To import the Suitcase, navigate to Database → Suitcase.
On the Suitcase screen, click “Import” and paste in the suitcase ID.
Suitcase ID: f5a4e9c8-55e4-4ec6-be79-bd859f25d6f0:cgv
Click “Retrieve” to complete the process.
3: Remap the CV source format
Your Slate instance should now have access to all the source fields. Slate’s built-in functionality for remapping is currently broken so you’ll need to remap all fields manually yourself. Is this annoying? We agree! Please file a support ticket with Slate to get their attention on this problem!
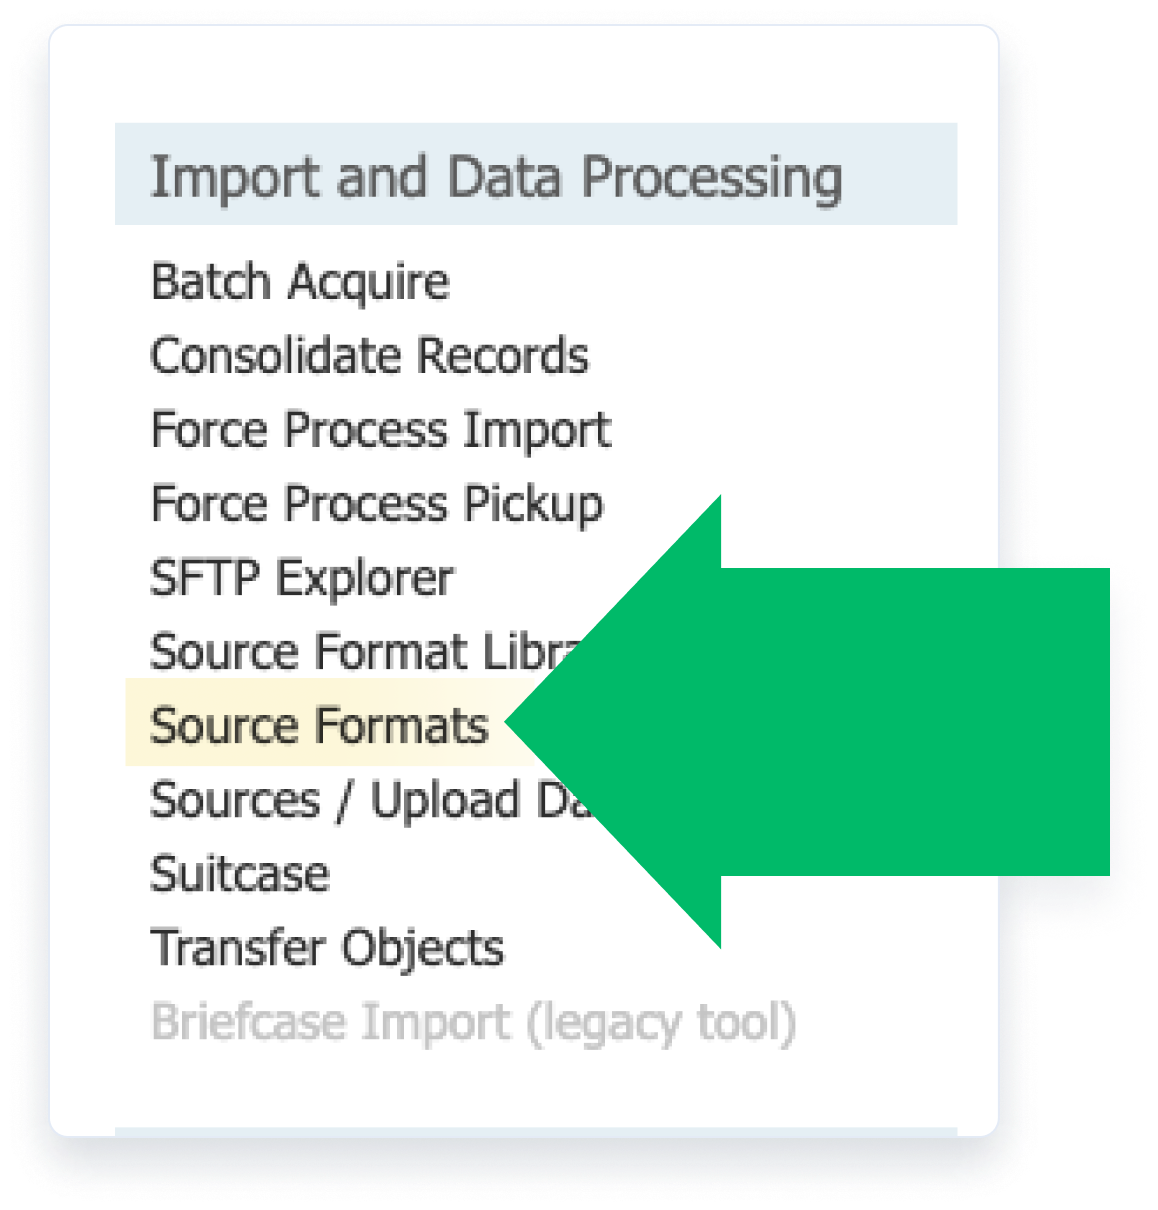
To manually remap, navigate to “Database”. In the “Import and Data Processing” section, select “Source Formats”.
Select the source format you just imported (CV V5.2) and click “Remap” in the right sidebar.
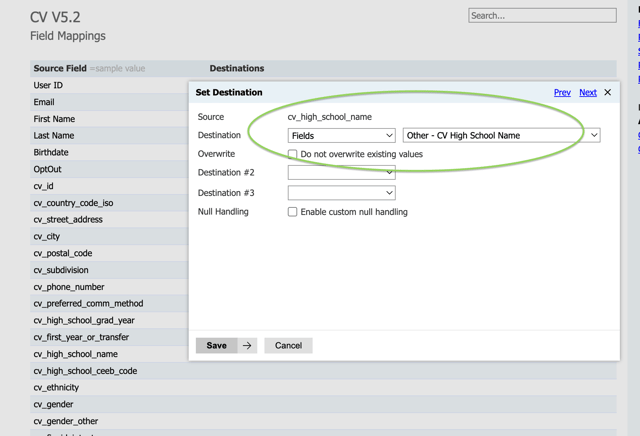
You’ll be presented with a table of all the new source fields you just imported. For each of these source fields, you’ll need to map them to the appropriate Destination in Slate. To map a source field, click on it, select the Destination type, and select the Destination name.
There are three Destination types we’ll be mapping in this setup: record, tag, and fields. To make the remapping as easy as possible, please refer to the Remapping Appendix at the end of this guide for how to remap each field.
Record Destinations
Map the User ID, Email, First Name, Last Name, and BirthDate fields to Record Destinations on your Slate contact record. The Destination names are the same. This keeps CollegeVine students synced with your contact records.

Tag Destinations
Map the OptOut source field to the Tag Destination and select “Tag: Opt Out” for the Destination name. This enables us to opt out any students that have removed their connection with your institution on CollegeVine.

Field Destinations
Finally, map the remaining source fields to Fields Destinations and select their corresponding Destination names. All the Destination names from CollegeVine are prefixed with “Other.”
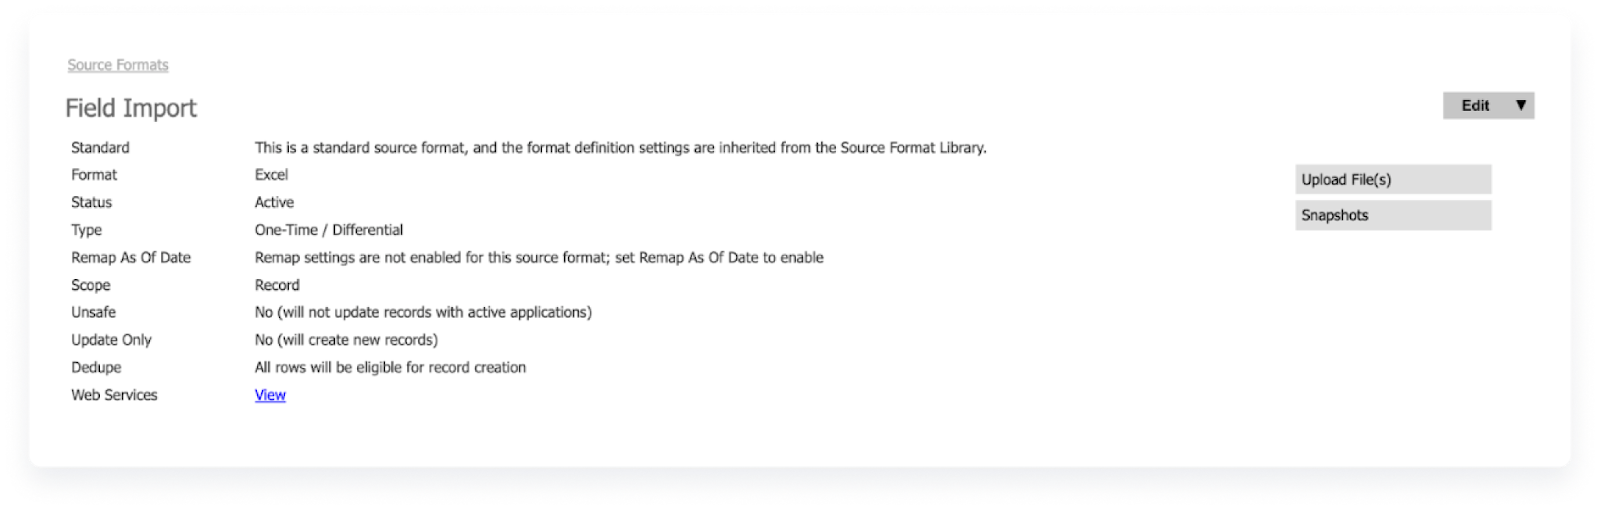
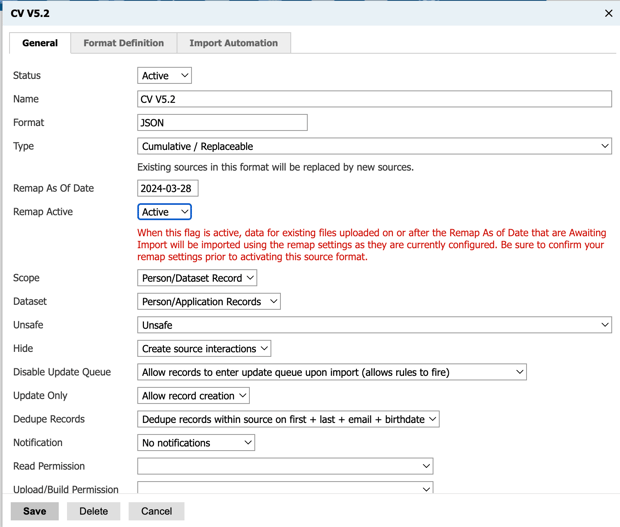
4. Activate the CV source format
Source formats must be activated before they can be used to transmit data from CollegeVine to Slate. Navigate to Database → Source Formats. Click on the “CV V5.2” source format. Click “Edit” and set the Status to “Active”. Set “Remap Active” to “Active”. Finally, click “Save”.
5. Copy your new web endpoint URL
Next, you need to copy the new web endpoint URL for the latest source format. To do this, navigate to Database → Source Formats.
Select the source format you just imported (CV V5.2) and click “View” next to Web Services. The URL that appears in the modal is the web endpoint URL.

6. Enter the Credentials into CollegeVine
If you’re the Slate admin for your school, you should already have an account on CollegeVine with the correct permissions. Click the tab in CollegeVine for “CRM”

Once on the page, identify your currently active integration and click the ⋮ menu to “Edit”.

Change the integration version to “5.2” and paste the new web endpoint URL you copied in the previous step. There are no other changes needed. Click “Save” to confirm.

Congratulations! You’re now on the latest version! 🎉